
If you’ve been scratching your head, wondering how to optimize the PCSX2 emulator for a lag-free, high-speed gaming experience, you’ve come to the right expert.
As someone deeply familiar with PCSX2, I can tell you that it’s a versatile, open-source emulator that lets you play a broad array of PlayStation 2 games. And the best part? It’s compatible with nearly every operating system out there—Windows, Linux, and macOS included.
Now, it’s worth noting that PCSX2 is a bit of a resource hog. It supports custom resolutions, text-filtering, and anti-aliasing, so you’ll need a fairly robust system to run it smoothly. But don’t worry if your computer isn’t exactly a powerhouse; with a few clever tweaks, you can still get PCSX2 up and running.
So, let’s let me show you how to fine-tune PCSX2 on your machine for optimal performance.
Configure for the Best Performance

If you’re keen on getting the most out of your PCSX2 emulator, whether you’re running a high-end gaming rig or a more modest setup, you’ve got options. Sure, upgrading your hardware to the latest specs is the most straightforward path to a smoother experience. But there are also specific games that are less demanding and can run without a hitch on most systems.
Step-by-Step Guide:
First things first, launch your PCSX2 emulator. We’ll be diving into the Emotion Engine and microVu compiler settings, which are crucial for optimal performance.
Best Emulation Settings
#1. In the menu, you will find several options. You need to click on the ‘Config’ option and then a new menu will appear. You need to click on “Emulation Settings”.
In the ‘Emulation settings’ dashboard, you will have several options. You have to configure all the settings one by one very carefully. Under EE/ECP options, you need to configure all the options as stated below —
-
-
- Emotion Engine > Select the “Recompiler”.
- ICP > Select the “Recompiler”.
- EE/FPU advanced Recompiler options > Select the “Chp/Zero”.
- Clamping Mode > Select the “None”.
-
#2. Under the VUs options, you need to configure all the options as stated below —
-
-
- VU0 > Select the ‘microVU Recompiler’.
- VU1 > Select the ‘microVU Recompiler’.
- Round Mode > Select the ‘chop/zero’.
- Clamping Mode > Select the ‘None’.
-
#3. In the GS dashboard, You need to find ‘Frame Skipping’ options. And then there you need to select the ‘Constant Skipping’ option. And then enter 1 in ‘Frames to Draw’ input box and then 2 in the ‘Frames to skip’ input box.
#4. You do not need to configure anything under GS Windows settings.
#5. In the Speedhacks dashboard, you need to tick on “Enable Speedhacks” option first.And then increase the EE Cyclerate [Not Recommended] to 33% and VU Cycle [Not Recommended] to 33%.
- Select the INTC Spin Detection.
- Select the mVU Falg Hack.
- Select the Wait Loop Detection.
- Select the MTVU (Multi-Threaded microVU1).
#6. In the ‘Game Fixes’ settings dashboard, you no need to configure anything.
#7. That’s it.
Best Plugins Settings
PCSX2 offers a wide range of customization options, allowing you to tweak the settings to get the best performance and visual quality. Here are some of the best plugin settings:
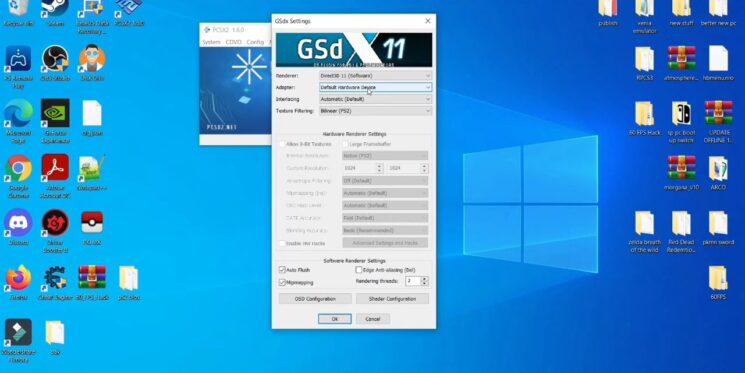
GS Plugin: GSdx
The GS plugin is responsible for rendering the graphics of your game. The GSdx plugin is the most accurate and compatible plugin available for PCSX2. I recommend using the GSdx 20200506140834 (MSVC 19.25 AVX2/AVX2) 1.2.0 [GSdx32-AVX2] version, as it provides the best performance and visual quality.
To configure the GSdx plugin, you should select the “Direct3D 11 (Hardware)” option in the “Renderer” dropdown menu. This will enable hardware acceleration, which will improve performance and visual quality. You can also enable the “MTVU (Multi-Threaded microVU1)” option to further improve performance.
PAD Plugin: LilyPad
The PAD plugin is responsible for handling the input from your controller. The LilyPad plugin is the most compatible and feature-rich plugin available for PCSX2. I recommend using the LilyPad (20200506140834) 0.12.1 [LilyPad] version.
To configure the LilyPad plugin, you should select your controller in the “Device Diagnostics” dropdown menu. You can also configure the button mappings and analog sensitivity in the “Pad 1” tab.
SPU2 Plugin: SPU2-X
The SPU2 plugin is responsible for handling the audio of your game. The SPU2-X plugin is the most accurate and compatible plugin available for PCSX2. I recommend using the SPU2-X 20200506140834 2.0.0 [Spu2-X] version.
To configure the SPU2-X plugin, you should select the “Portaudio” option in the “Module” dropdown menu. This will enable low-latency audio, which will improve audio quality and reduce audio lag.
CDVD Plugin: cdvdGigaherz
The CDVD plugin is responsible for handling the disc image of your game. The cdvdGigaherz plugin is the most compatible and feature-rich plugin available for PCSX2. I recommend using the cdvdGigaherz 20200506140834 0.11.0 [cdvdGigaherz] version.
To configure the cdvdGigaherz plugin, you should select your disc image in the “Plugin Settings” tab. You can also enable the “No disc” option to bypass the disc check.
USB, FW, and DEV9 Plugins: USBnull, FWnull, and DEV9null
The USB, FW, and DEV9 plugins are responsible for handling the USB, Firewire, and Ethernet functions of your game. If you’re not using these features, you can safely use the USBnull Driver 20200506140834 0.7.0 [USBnull], FWnull Driver 20200506140834 0.7.0 [FWnull], and DEV9null Driver 20200506140834 0.5.0 [DEV9null] versions. These plugins are lightweight and won’t affect performance.

Best Video(GS) Plugin settings
- Adapter > Select the ‘Inter(R) HD Graphics’.
- Renderer > Select the ‘OpenGL (Hardware)’.
- Interlacing (F5) > Select ‘Auto’.
- Internal Resolution > Select the ‘Native’.
- Texture Filtering > Select the ‘Nearest’.
- CRC Hack level > Select the ‘Full (Safest)’.
Best Audio (SPU2) Plugin settings
- Interpolation > Select the ‘Linear (simple/okay sound)’.
- Disable Effects Processing.
- Module > Select the ‘XAudio 2 (recommended)’.
- Synchronizing Mode > Select the ‘TimeStretch (recommended)’.
- Select ‘Use a Winamp DSP Plugin’.
And then save the settings. That’s it.
FAQ

What are the best PCSX2 settings for high-speed performance?
The best PCSX2 settings for high-speed performance depend on your computer’s hardware specifications. However, you can use the GSdx, LilyPad, SPU2-X, and cdvdGigaherz plugins to improve performance. Additionally, you can enable hardware acceleration, multi-threaded microVU1, and low-latency audio to further improve performance.
How can I enable hardware acceleration?
To enable hardware acceleration, select the “Direct3D 11 (Hardware)” option in the “Renderer” dropdown menu in the GSdx plugin settings.
What is multi-threaded microVU1, and how can I enable it?
Multi-threaded microVU1 is a feature that improves performance by distributing tasks across multiple CPU cores. To enable multi-threaded microVU1, check the “MTVU (Multi-Threaded microVU1)” option in the GSdx plugin settings.
How can I enable low-latency audio?
To enable low-latency audio, select the “Portaudio” option in the “Module” dropdown menu in the SPU2-X plugin settings.
Can I improve performance by overclocking my CPU or GPU?
Overclocking your CPU or GPU can improve performance, but it can also cause stability issues and reduce the lifespan of your hardware. We recommend using the recommended plugin settings and enabling hardware acceleration, multi-threaded microVU1, and low-latency audio before considering overclocking.
Final Words
So, there you have it—a guide to optimizing your PCSX2 emulator for the ultimate gaming experience, straight from an expert. Whether you’re running a high-end machine or making do with less powerful hardware, these tweaks should help you get the most out of your PlayStation 2 games.
Much like the GBA emulators that allow you to relive iconic moments from games like ‘A Link to the Past,’ the right PCSX2 settings can make your gaming experience truly unforgettable.
Remember, PCSX2 is incredibly versatile and can be fine-tuned to meet your specific needs. So go ahead, apply these settings, and dive back into those classic games with newfound smoothness and speed.